DIY Canvas Wall Hanging and a Special Offer
9:14 AM
I received a product in exchange for this review. As always, all opinions are my own.
I've been working on Dax's big boy room little by little. When I began planning its refresh, I decided to skip a theme. Since he's still little I know his interests will change. It feels like he was in his nursery just yesterday so I want to make sure this room can easily grow with him. For now, I'm incorporating all of the things he's into at 3. From truck bedding and vintage football decor to animals and superhero capes, it's all the stuff When Photowall Sweden approached me to collaborate, it was the perfect opportunity to use large statement art in Dax's new reading nook and to try something I've always wanted to DIY- a wall hanging. I'll show you how I did it plus I'm sharing some of my favorite Photowall Sweden designs and a special promo code for Pretty Real readers at the end of the post!
While I love their designs, I knew I wanted a big bear in Dax's room. I purchased a bear image and had it made into a beautiful canvas. The ordering process is very simple. After you upload your image, you can choose dimensions and whether you want the canvas sent with a frame or on its own. If you'd like a traditional canvas, order it with the frame. The simple instructions to wrap your canvas will be sent along with the rolled canvas. For this project, choose canvas only. Here's how I made the DIY frame:
Materials:
- canvas from Photowall Sweden
- staple gun
- two wood boards cut 1-2 inches wider than your canvas
- Mine were .75 x 1.5 x 6 feet. I used a Mitre saw to cut them down to about 26 inches long.
- stain of your choice (optional)
- eye hooks
- twine
- pencil and ruler
- command strips (see note in Step 7)
Step 2: Use a pencil to mark where your eye hooks will go making sure it's an equal distance from each end. Use a thumbtack to make a tiny hole. This is where you'll screw in your eye hooks but making that tiny hole first makes it much easier. A fork works well to help screw in the eye hook.
Step 3: Lay canvas on a clean surface, face side down and then line wood up underneath (make sure the stained side is facing the floor!).
Step 4:
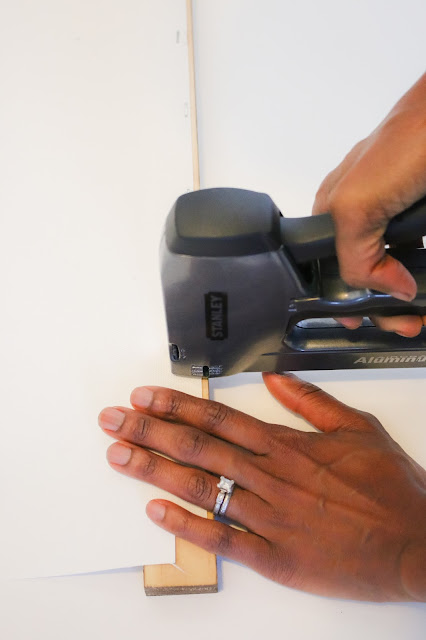
Starting in the middle, and holding slightly taut, staple the canvas to the wood. Work your way to the edges.
Repeat the process with the bottom edge. Make sure your staples are at the top of the wood so that there's not a gap between the wood and the canvas (learned this one the hard way which is why you see two rows of staples).
Step 6:
Thread the twine through your eye hooks, trim the extra twine, and hang on the wall! I used a small black hook found in the hardware section.
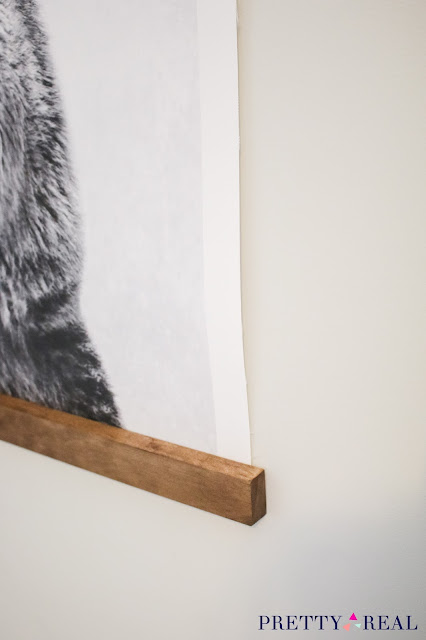
When I hung the canvas it wasn't completely flush with the wall. I assume it's due to the thickness of the wood. To avoid this you could use a thinner piece of wood or use command strips on the back of the canvas to adhere it to the wall like I did.
Isn't it beautiful?!
A Few Notes:
As I mentioned, thinner wood might work better so that your canvas can truly hang. I wanted to minimize cuts (I'm new to cutting wood and don't have a table saw) so I simply used the most finished wood I could find at Home Depot.
My canvas is 24x36. In hindsight 18x24 might have been better. You can choose whatever size works best for your space!
The canvas itself is beautiful. It's well made and easy to work with. The picture is crystal clear. I wish I'd been bold enough to try a wall mural as their designs are so stunning (this designer is my favorite!). Unfortunately, there's not a straightforward way to get a 'to scale' sample of their murals. That made it difficult for me to choose a design and why I ultimately decided to go the canvas route. But I have to say, I'm so glad I did. I love, love, love Dax's big canvas and it makes such an impact in his room.
Here are some of my favorite canvases from Photowall Sweden.
Canvases for Kid Spaces:
(From Left to Right)
Helpful Tip: There are many great designs to choose from. To narrow it down, search specific themes like "map" or "quotes" for example. They also have a helpful "search by category" section. Some of the prints below would also work well in a kid space. I love the moon one for a star wars themed room...
Canvases Suitable for Grown Up (or Teen) Spaces:
Which painting or wall mural would you choose? Is there a space in your home that could use a refresh?!


5 comments
Oh how fun! What a nice touch it makes in the room too!
ReplyDeleteThat turned out beautiful! The kid canvas options are so cute!
ReplyDeletethank you!
DeleteI love this canvas! My son has some safari animal prints hung in his room.
ReplyDeleteThat's such a cool idea! I love the way it came out!
ReplyDeleteLiz
Www.lizzieinlace.com