Plans and Progress on the DIY Built-Ins - ORC Week 2
8:00 AMDetermining the Base/Inspiration:
The first step in planning our DIY built-in was figuring out the base. We are new at woodworking and had zero desire to build the base from scratch. I'd seen Lauren at Handmakes Home use these cabinet bases for this project and we even considered the very same cabinets for our office nook last spring (pictured above). But the measurements weren't quite right and I wanted shaker-style cabinets.
I continued my search and eventually came across Sarah's 2020 ORC makeover. I was smitten. She used IKEA SEKTION cabinets for the base, semi-handmade cabinet fronts, and built the shelves. It looked challenging but doable.
Here's one last inspiring space I came across. Everything Chelsey does is gold and these built-ins are so beautiful! She used these cabinets. But I needed a little more flexibility with measurements.
Our Plan
I committed to the 2nd option- IKEA boxes with Semihandmade doors. Semihandmade makes various styles of cabinet doors that fit IKEA boxes and even sell a DIY paintable option. These short paragraphs = weeks in real time, FYI. ha. The first step was figuring out which IKEA cabinets to use. Considering our family room's size and our storage needs, the SEKTION style worked best.
IKEA Planning
Ikea has a convenient planning tool on its website that helped immensely with figuring out configuration. You can drag and drop different styles into your space until you get it just right. Once you add all the pieces, IKEA builds a shopping list for you. I recommend checking to see if the items are in stock before you head to the store. Also make sure to have your printed list with you. The IKEA employee who helped us immediately noticed we'd need more hinges. We triple checked the list and items before driving the 3 hours home! We purchased three 36" Sektion cabinets and two 30" Sektion cabinets along with all the required legs and hardware. Make sure you don't buy the door fronts or toe kicks if you're getting those from Semihandmade.
Working with Semihandmade
Semihandmade's customer service is amazing. Any time I wasn't sure or had a question, I'd contact them and they'd assist. They also have an estimate tool that's helpful- especially if you're planning a really big project. Here's what we purchased from Semihandmade:
Assembling and Hanging the Cabinets
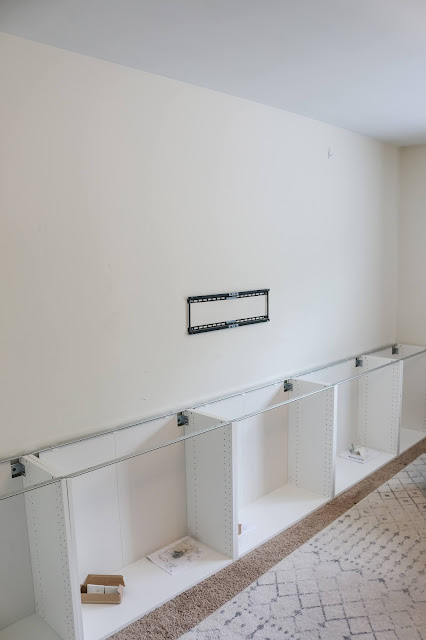
As for assembling the cabinets, I'm happy to report it wasn't difficult. We followed the instructions carefully. The only tricky part was attaching the legs. You can decide their length and they slip off pretty easily before the cabinets are locked into place. Because we didn't want them to break (they're plastic) we removed them until we were ready for that step and reattached once we hung the cabinets on the wall.
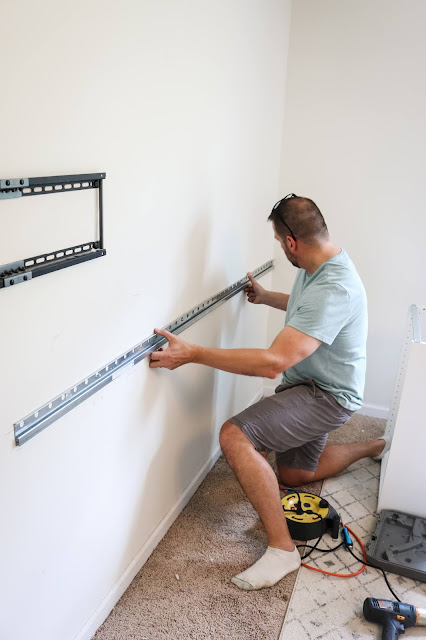
To hang the cabinets on the wall, we followed the instructions. The important thing is to make sure the rail is level. It's helpful to have two sets of hands on deck for this step. As long as you drill into the studs and have your level handy (a longer one is useful here), you should be good to go. When you screw into the backplate, there's a little space so that if the cabinets need to shift slightly, it's possible and this helps get them level. But it's really slight so you don't have a great deal of wiggle room.
So that's where things stand- cabinets are assembled and hung! Next week I'll walk you through how to install vertical shiplap and hide unsightly cords. I see so many people advertising the latter and charging hundreds of dollars; it's definitely worth DIYing! See you next week!
List of to-dos below and I'm trying not to panic! There's still so much left to do!
Task List:
Install Vertical Paneling
Hide all the Cords!
Build a Built-in Entertainment System
- build and hang IKEA boxes
- build DIY shelves
- make a countertop
-install semi-handmade doors and toe-kick
Paint the Built-In/cabinetry
Paint the Room - I'm getting closer to choosing a paint color but yikes, I don't have much time!
DIY game/side table - I started the table! You can see my progress in stories!
Choose Art
Choose Accessories (hardware, pillows, drapes...)
Style and Shoot!
Come back next week- I'll share how to install vertical shiplap and how Joe hid the wires--I can't believe it took us this long to tackle it! I'm sharing lots of behind the scenes over on Instagram as well. And make sure to check out the other designers below!
Ariene C. Bethea | At Home With Ashley | Banyan Bridges | Bari J. Ackerman | Brit Arnesen
Brownstone Boys| Cass Makes Home | Dominique Gebru | Gray Space Interiors| Haneen's Haven
Home Ec. | Nile Johnson Design | Pennies for a fortune | Prepford Wife | Rachel Moriarty Interiors
Sachi Lord | Susan Hill Interior Design | This Is Simplicite | Victoria Lee Jones


0 comments