How To Create a Modern Board and Batten Wall Treatment
9:09 AMThis post contains affiliate links
When I finished Dax's room, I promised to circle back and share a tutorial for his modern board and batten. Let me be the antithesis of a typical influencer and say no one was asking (haha) so I kind of moved on. But lately DMs have popped up asking how I did it so I figured it's time to do what I said I'd do, like 14 months ago. Oops. Here's how to complete a modern board and batten wall treatment-
But first, let me say I'd never seen a treatment like this before. It was inspired by this ad in Crate and Kids. I loved how it felt playful and modern and a bit quirky. It felt like a bit of a risk but I figured that if it looked odd or unfinished, I could simply add a horizontal board on top, and it would lean more traditional. Spoiler, it's been over a year and I still love it as is. I'll also add that this was our first trim project, we had a deadline looming (hence no tutorial as we went) and my father-in-law saved the day! He's a long time DIYer and saved us so much time figuring things out. Thanks bubba!
Ok let's get into it. Here's what you'll need for this project:
Supplies:
trim- Mine was 3/4" x "1 x 8'. The nearly square shape is one of the keys to the casual, modern look I was going for!
liquid nails- optional; more on this later
caulk and caulk gun- I swear by these particular types. They make the job so much easier!
nail gun (optional)- we used a hammer and nail but definitely could've/should've used our nail gun/compressor combo.
table saw or chop saw to trim the trim.
spacer for top
spacer for in between slats
Paint - we used Clark + Kensington Gothic Iron
Tutorial:
You can see a lot of these steps in action here!
As for how far to float them from the bottom, I eyeballed it. I ended up making the distance from the bottom greater than from the top. Because of perspective, it looked like the bottom was touching the baseboards. In the end, the trim pieces are 1" from the top and 2" from the bottom.
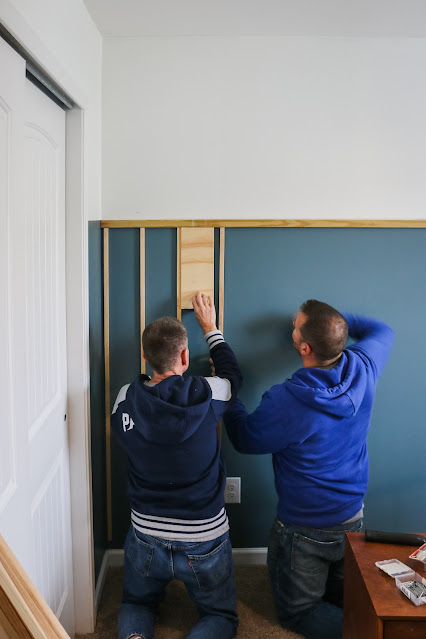
Make your spacers - we used leftover wood to make spacers for the top of the trim, and in between each piece of trim. Simply cut a piece of wood according to your measurements.
Drill pilot holes in trim pieces and trim them if necessary*. Since the wood was so narrow, Joe drilled pilot holes into the trim pieces so they wouldn't split when we nailed them to the wall. And I trimmed the length. Our final pieces ended up being 57 1/2" long.
*in hindsight we could've just used the nail gun and skipped the pilot holes. Again- this was our first trim project and we were...cautious. ;)
Attach your top spacer. There may be a different/easier way to make sure all the pieces align at the top (a laser level?) but since my plan was to have them 'float' on the wall, we wanted to make sure they were all even. My father-in-law attached a long scrap piece of wood on top- I later filled the holes it made and repainted- to ensure they all lined up. Just make sure the spacer is level!
Using the nail gun, nail the trim to the wall. This was our very first trim project and we ended up gluing them in addition to nailing them because just using nails left big gaps between the trim and the wall. Since then, I've learned the crisscross trick. That is totally its official name btw. This is where you nail at an angle/up and then cross that one by nailing at an angle/down. This sort of pulls the wood to the wall and eliminates big gaps without using glue. We never use glue anymore and this trick works!
Halfway through we stopped to measure to make sure we were on track with our measurements (you can see this in the highlight here).
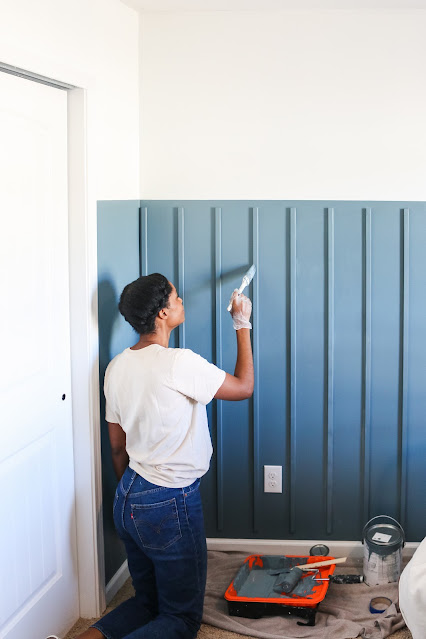
Finally, fill the nail holes, caulk, and paint the trim. Using the right caulk gun and caulk makes a WORLD of difference. If you don't already have your go-to's, use those I linked above!
What do you think? Would you try this? The math is the hardest part, honestly. ha.


.jpg)


2 comments
This is perfect!! How tall are your ceilings and how many feet did you paint up the wall?
ReplyDeleteI'm sorry for the delay! The ceilings are 8' and the blue is 64" (2/3).
Delete