How to Make Shelves With Two Narrow Boards: One Room Challenge Week 6
12:01 AM
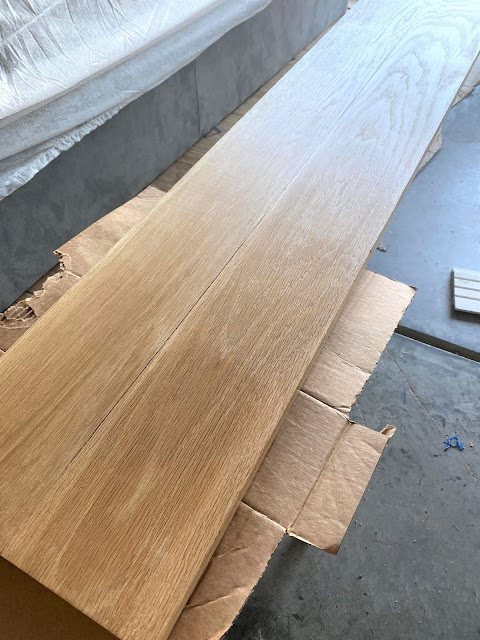
Welcome to Week 6 of the One Room Challenge! Week 5 was canceled (you can read about that here)* but I'm excited to share the next (and a big!) step in the process- making the wall shelves! If you're new, check out weeks 1, 2, 3, and 4 to catch up on our Office Nook progress! The biggest challenge we faced with our DIY shelves was finding wood (white oak in this case) wide enough. My ideal width was 10-12" wide. To solve that problem, we decided to join two narrow boards together to make one shelf with a 10 1/2 inch depth. I was concerned that the planked look would lean "farmhouse" but that's not an issue at all. They look clean and simple and we're really happy with them! So here's how we did it!
*While I did not share my thoughts/feelings on George Floyd's death and the events that followed, here on the blog, I shared some thoughts on Instagram. I read one quote that we're not required to process our grief publicly and I'm thankful for that because I'm still trying to work through it. The thoughts I shared are in a highlight on my Instagram page along with a few in-feed posts, if you care to watch/read them.
Back to the shelves:
Clamps
Dowels
Wood Glue
Miter Saw
Table Saw
Drill
Sander with 80 grit sandpaper
Polycrylic
Nylon Paint Brush (a 3 inch and a 1 inch for the sides)
We found 4 pieces of 5/4 white oak (that means 1 1/4 inch) at 98 inches. We ordered "shop work" from the lumber yard- they planed them so that each side was straight. They were all around the same length so they did not need to trim them. It cost us an additional $40 for the shop work. The total was about $250 for the wood + shop work.
Once he did that and matched them up, the next step was to join them together. To do that he drilled holes along each edge using this JointMate dowel jig tool to line up the holes and dowels for a secure fit. The instructions that came with the tool were thorough to make sure the holes were aligned and at the right depth so everything lined up when he tested before gluing. If anything was out of line, there was plenty of room to make additional holes if needed.
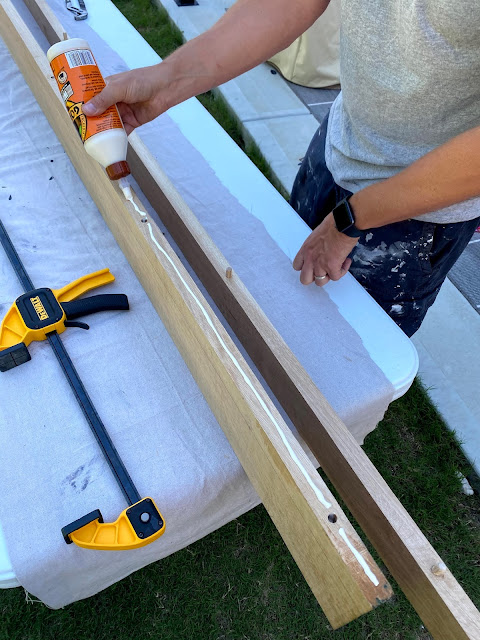
Next, he removed the dowels, filled the holes with wood glue, re-inserted the dowels, put glue along the seam of the wood, and joined the two pieces together. (Some of this is recorded in my DIY shelves highlight over on Instagram if you're a visual learner!). Make sure to wipe the excess glue off immediately so it doesn't dry.
He then used clamps to clamp together for 24 hours.
After they were securely glued together he trimmed each edge using a miter saw to make sure they were the exact same length and then we sanded them using an orbital sander and 80 grit sandpaper. We probably could have gone with rougher sandpaper. but it got the job done.
Next, I protected them with Polycrylic. I shared some tips on using Polycrylic in the DIY shelves highlight on Instagram. Using a quality nylon brush (this one is my favorite), I brushed a small amount onto the shelves. I used long strokes to avoid lots of brush strokes, tried to avoid over-brushing, and made sure to sand in between coats using very fine-grit sandpaper. Basically, I followed the instructions on the can. I will add that when I shared this process in my stories, more than a few people recommended using wipe on poly (for what it's worth).
SO this is where we were supposed to mount them and give you the satisfaction of seeing the space THIS CLOSE to being finished! But if you watched my stories, you know that we went out of town a few days early on a whim (who are we?!) and so, missed our opportunity to mount the shelves. That will happen this weekend so stay tuned! (I can barely wait!).
But you've at least earned a better photo of where we're at than you got last week! ;)
Install Paneling
Pick a paint color and Paint
Choose Wood for a Floating Desk
Install Floating Desk
Figure out outlets/install
Choose wood for shelves
-choose shelf brackets- we chose these and love them!
Choose Chairs
Add a runner - I got this one and I LOVE it and it's $40 less than I paid for it right now!
Purchase Office Accessories
Style the shelves
And things I forgot to add in the first list (uh oh):
Poly the shelves
Poly the desk
Join the shelves
Paint the supports the desk rests on
Make sure to check out all the wonderful projects over on the One Room Challenge blog link-up page!
*Affiliate links included in the post.
*While I did not share my thoughts/feelings on George Floyd's death and the events that followed, here on the blog, I shared some thoughts on Instagram. I read one quote that we're not required to process our grief publicly and I'm thankful for that because I'm still trying to work through it. The thoughts I shared are in a highlight on my Instagram page along with a few in-feed posts, if you care to watch/read them.
Back to the shelves:
Supply List
JointMate Jig Tool (this was clutch!)Clamps
Dowels
Wood Glue
Miter Saw
Table Saw
Drill
Sander with 80 grit sandpaper
Polycrylic
Nylon Paint Brush (a 3 inch and a 1 inch for the sides)
The Specs:
We found 4 pieces of 5/4 white oak (that means 1 1/4 inch) at 98 inches. We ordered "shop work" from the lumber yard- they planed them so that each side was straight. They were all around the same length so they did not need to trim them. It cost us an additional $40 for the shop work. The total was about $250 for the wood + shop work.
How to Make Planked Shelves
Next, Joe measured each piece to make sure they were straight. A couple pieces needed trimming so he determined which piece would go with which (remember we were using 2 pieces to make each shelf) so he could trim off the precise amount to get the final width. To do this, he measured and marked a straight line lengthwise on the piece and then made a straight cut using a table saw.Once he did that and matched them up, the next step was to join them together. To do that he drilled holes along each edge using this JointMate dowel jig tool to line up the holes and dowels for a secure fit. The instructions that came with the tool were thorough to make sure the holes were aligned and at the right depth so everything lined up when he tested before gluing. If anything was out of line, there was plenty of room to make additional holes if needed.
Once all the holes were drilled, he inserted the dowels and put the two pieces together just to make sure everything fit prior to gluing.
Next, he removed the dowels, filled the holes with wood glue, re-inserted the dowels, put glue along the seam of the wood, and joined the two pieces together. (Some of this is recorded in my DIY shelves highlight over on Instagram if you're a visual learner!). Make sure to wipe the excess glue off immediately so it doesn't dry.
He then used clamps to clamp together for 24 hours.
After they were securely glued together he trimmed each edge using a miter saw to make sure they were the exact same length and then we sanded them using an orbital sander and 80 grit sandpaper. We probably could have gone with rougher sandpaper. but it got the job done.
Next, I protected them with Polycrylic. I shared some tips on using Polycrylic in the DIY shelves highlight on Instagram. Using a quality nylon brush (this one is my favorite), I brushed a small amount onto the shelves. I used long strokes to avoid lots of brush strokes, tried to avoid over-brushing, and made sure to sand in between coats using very fine-grit sandpaper. Basically, I followed the instructions on the can. I will add that when I shared this process in my stories, more than a few people recommended using wipe on poly (for what it's worth).
SO this is where we were supposed to mount them and give you the satisfaction of seeing the space THIS CLOSE to being finished! But if you watched my stories, you know that we went out of town a few days early on a whim (who are we?!) and so, missed our opportunity to mount the shelves. That will happen this weekend so stay tuned! (I can barely wait!).
But you've at least earned a better photo of where we're at than you got last week! ;)
You guys, we're so close! Here's an updated list!
Figure out outlets/install
-potentially paint shelves
Install shelvesPurchase Office Accessories
Style the shelves
And things I forgot to add in the first list (uh oh):
Paint the supports the desk rests on
Make sure to check out all the wonderful projects over on the One Room Challenge blog link-up page!
*Affiliate links included in the post.


3 comments
I love how it’s coming together, can’t wait to see the shelves up!!
ReplyDeleteThanks Tamsyn!
DeleteYou said you had the edges planed, yet you show saw marks on the edge you joined together with the dowels. Wasn’t the point of planing the boards to have a straight edge to join? It’s hard to see, but was there a little gap at the dowel joint?
ReplyDelete