How to Turn a Cluttered Closet into Organized Craft Storage
6:31 PMThank you Command Brand for sponsoring this post. All opinions are Mine.
STEP 1
Take everything out. I mean it. Ruthlessly edit your piles. After trying to sell a few things I realized it was more important for my peace of mind to just get. it. out. of. my. house. I bagged up jackets, t-shirts, pillows, and little home decor items. I tossed dried up crafting stuff, kits, supplies we'd never used, and office supplies that had been in a storage container since we moved in five years ago. Guys, if you haven't touched it in 6 months, you never will. Throw that crap away. I mean it.
STEP 2:
Sort. Put like items together. Toss duplicates. My piles had piles but it was necessary. I had:
-home decor items
-pillows
-fabric and yarn
-party supplies (banners, balloons, streamers, etc)
-wrapping paper
craft supplies which I sorted into:
-Cricut tools
-paper
-tools (punches, etc)
-felt
-embellishments
-twine/ribbon
-tape
-misc.
-sewing supplies
NOTE: It's really important to sort before you go buying furniture and containers. I know that's the fun part, but you should have an idea of what size and how many storage tools you need.
STEP 3:
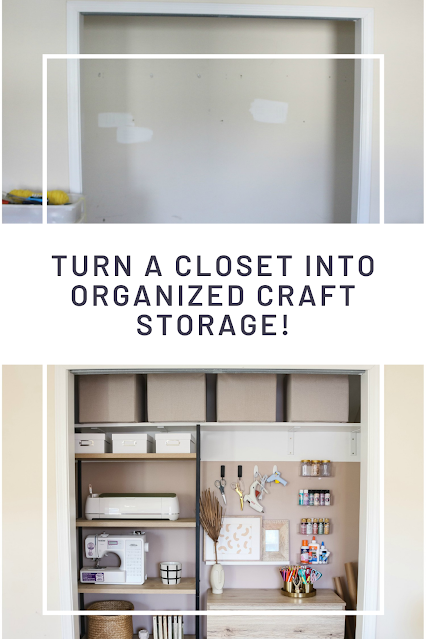
Here's where you think about your goals, the space you have to work with, and make some decisions. Decisions such as the size of the storage unit, type (open vs. closed), and location. I made the following decisions after thinking through my goals and seeing all the items I needed to store from step 2- not only craft storage but also products/decor for work).
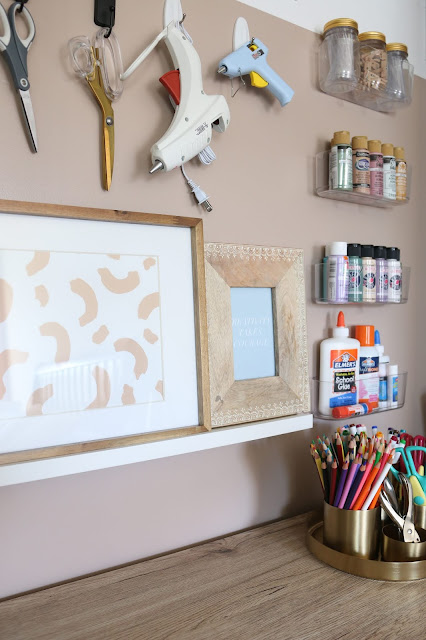
1. I needed wall storage. I didn't want to waste wall space so I used hooks and containers that would work on the wall. Enter Command Brand. I've talked about them before because I love them. ha. There's nothing like affordable and easy-to-install storage solutions. Command™ Brand has so many options to choose from- ledges, a variety of hooks, caddies- you name it. You don't have to destroy your walls or be stuck with a specific arrangement forever. Their products can be easily removed and come with extra strips so if you change your mind or position incorrectly, you can quickly remedy it without causing any damage to your walls.
Command™ Large CaddyCommand™ Medium Matte Black Hooks
2. I needed open shelving- something I could store large or fragile objects on and be able to clearly see what I was working with. Often I have products for work that I need to store until I shoot them.
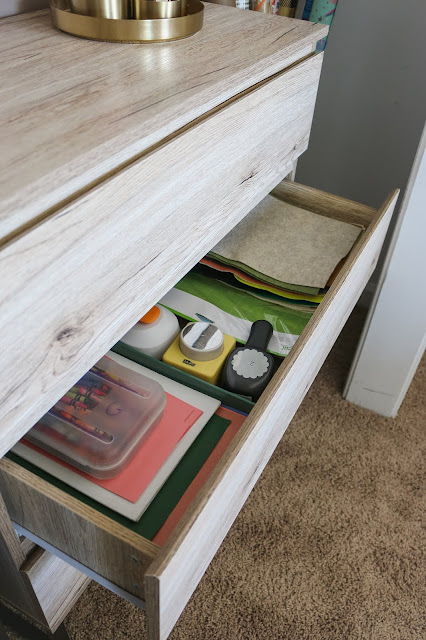
3. I needed hidden storage. Easily accessible but not open for the world to see is kind of the gold standard of organizing. Opening a drawer is a lot easier than pulling out a box and taking off a lid.
STEP 4:
Now that you have your formula, figure out configuration and smaller storage (mine was a shelf, a small dresser, Command Medium Matte Black Hooks, Command Medium Wire Hooks, a Command Picture Ledge, and Command Large Clear Caddies).
I removed the doors so that I could easily pull out the drawers and still have room for the shelf. I then removed the bar and wire shelving and Joe installed a melamine shelf with these brackets.
STEP 4b (optional).
Paint. Paint makes everything feel fresh and extra points if you can do something a little unexpected that makes you smile when you see it. Ok, now it's time to get down to the nitty-gritty. Remember to wait 7 days after painting, before hanging Command™ Products!
STEP 5:
Next, look at your supplies and determine what type of smaller storage you need for them.
For the wall above the dresser- the fun part(!) I wanted to make it functional but also cute. It's me guys. For that reason, I chose a Command™ Picture Ledge to hold extra frames with some pretty art on them in the meantime. To determine placement I spaced my Command ™ Products out on kraft paper cut to the size of the area, did a loose trace, and then taped it to the wall.
I love the clear caddies. They are the perfect size for so many things but I used them for supplies we use most often- paint (the paint looks so pretty in them!), glue, and clips. I used the hooks for my glue guns and scissors. Those matte black hooks are so good, right? I also used large white hooks which are sturdy and perfect for my glue guns.
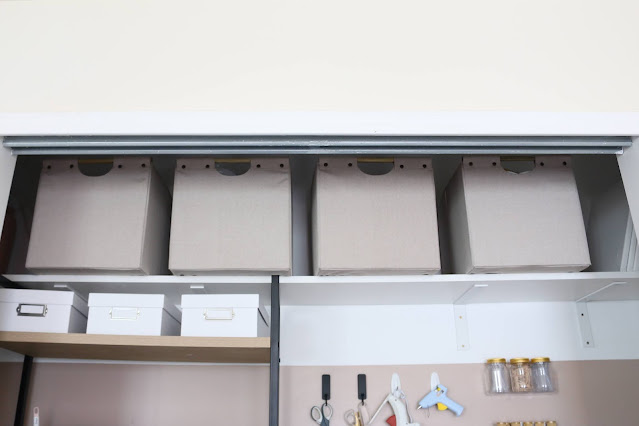
I bought these bins for the drawers, these fabric storage cubes for the top shelf, and these fabulous baskets.
The big bins house the items too big for the drawers- painting supplies, fabric + pillow covers, party supplies, and Cricut supplies. The small white bins house office supplies, sewing supplies, and miscellaneous. The baskets hold small decor items and blankets.
I'd like to label some things and I may end up adding a few hooks on the left and right walls of the closet but that leads me to the final step.
STEP 6:
Take a step back and appreciate how far you've come! And then use your space for a few weeks and see if anything needs tweaking. You may find that you need another caddy or an extra few hooks. That's the great part about creating a system that works for you!


13 comments
Looks great! May I ask what paint color you used? It's the perfect pink-y (but not overly pink) beige that I'm looking to warm up the walls in my bedroom.
ReplyDeleteIt’s complicated. Ha! I used farrow and ball dead salmon, color matched at he depot but mixed at 75% strength (so 25% lighter) but then after using it in my bathroom, I added a bit more white paint for the closet.
Delete*Home Depot
DeleteLol doesn't look like I'll be able to get an exact match but I appreciate you letting me know where I can start! I'll take a look at colors that are close and hope I get as nice of a result as you did, thanks!
DeleteI saw this in DIY magazine and would love to give myself this gift of an organized guest closet so I can actually enjoy my craft space. Thank you so much for sharing and helping me get started!
ReplyDeleteI love this! I read and kept the article in BHG and it has inspired me to redecorate my own craft closet! Thank you!
ReplyDeleteWhere did you purchase the chest?
ReplyDeletehttps://rstyle.me/cz-n/f898sab7h67 (sorry for the delay!!!)
Deletehttps://rstyle.me/cz-n/f898sab7h67
DeleteWhere did you purchase the chest? Was it difficult to find one that exactly fit 1/2 of your closet?
ReplyDeletehttps://rstyle.me/cz-n/f898sab7h67 - sorry for the delay!
ReplyDeletewhere did you get the open shelving?
ReplyDeleteHi! Do you mean the wood and metal shelf? It's linked at the bottom of the post -it's from target! IF you mean the white shelf at the top, it's from Home Depot.
Delete