How To Install Vertical Shiplap and What's Hidden Behind Ours - ORC Week 3
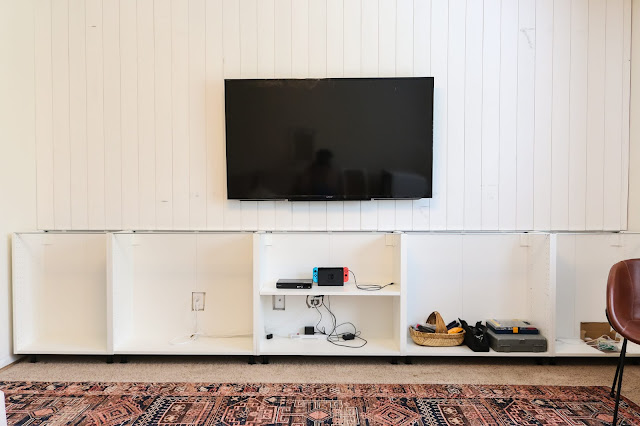
7:47 AMIt's week 3 of the One Room Challenge and the shiplap is complete. I repeat the Vertical Paneling in the Family Room is complete. Phew. There's so much left to do but adding a wall treatment and hiding cords (something that's been on our list for like ever) is a big to-do marked off. We've installed shiplap twice- here and here- but never shared a step-by-step tutorial for installing vertical paneling so keep reading for that plus a peek at what's hidden behind ours. I'll also add that this is a great beginner project if it's just one wall- there's not a lot of math or woodworking involved. You can do it!
First, the supplies you need to install vertical paneling:
Supplies
8 feet boards linked above. We found the 12 feet boards here. We used fifteen 12' boards and five 8' boards (for a total of 35 boards across).
*Estimate how many boards you'll need by taking the length of the wall and dividing by the width of the board (not including the 'lip'). Don't forget to get overage- they can always be returned.
Step 1
Using the stud finder, find the studs and then mark the ceiling to indicate where each stud is. This will help when you're installing the boards. More on this later.
Step 2
Measure the height of your wall (in our case it was from the ceiling to the cabinetry) and then mark your first board with that measurement. Cut that board and then make sure it's a snug fit before cutting your other boards. You may also want to take measurements along the way just to ensure they don't change. For example, if the floor isn't level, etc. Generally, it should be the same or very close.
Step 3
Cut your other boards.
Step 4
Now comes the fun part. Begin nailing your boards into place. Making sure your first board is plumb/level, nail it to the wall. Joe nailed about every 16." Continue nailing your boards- overlapping the lip - to the wall. The boards are being nailed to each other and to the wall, but when you come to a stud (see * above), add an extra nail to the stud for extra security.
Step 5
When you come to the end of the wall, you will likely have to cut a board to the right width to fill the leftover space. Measure the leftover space and follow the instructions from step 2.
Step 6
Fill the nail holes- tap them in if necessary.
Painting: Ideally, I'd have chosen a paint color already so I could paint the 'lip' of each board prior to installing. It's a bit of a pain to paint in-between the crevices but it's doable. If you're using a dark color though, you may want to consider that option.
Baseboards: We didn't have to deal with baseboards in this case, but here's how Joe's handled them in the past (in the office nook for instance): We reused the baseboard that was there. After carefully prying them off, we removed the nails, cleaned them up, and repainted them before nailing them back on with a finish nailer. No adjustments were needed for the back wall. The side baseboards had to be cut shorter to account for the thickness of the paneling.
Outlets: Again, we didn't have to deal with those for this 2/3 wall, but if you do, use electrical box extenders (make sure to do this prior to attaching the paneling). We learned that the hard way for the shiplap in the kids’ bath.
So did you catch what's hidden behind our shiplap? Fun dad alert. (insert siren here haha). Joe let the kids do this:
They were in shock and loved every minute of it. ♥
Here's our to-do list:
Task List:
Install Vertical Paneling
Hide all the Cords!
Build a Built-in Entertainment System
- build and hang IKEA boxes
- build DIY shelves
- make a countertop
-install semi-handmade doors and toe-kick
Paint the Built-In/cabinetry
Paint the Room - I chose a paint color this week. phew!
DIY game/side table - I started the table! You can see my progress in stories!
Choose Art
Choose Accessories (hardware, pillows, drapes...)
Style and Shoot!
Catch week 1 here and week 2 here! And come back next week to see...well I'll be honest. I'm not sure! ha! It'll either be all about paint or the DIY fluted table. Either way, it's gonna be good! Make sure to check out the progress of the other featured designers here:
Ariene C. Bethea | At Home With Ashley | Banyan Bridges | Bari J. Ackerman | Brit Arnesen
Brownstone Boys| Cass Makes Home | Dominique Gebru | Gray Space Interiors| Haneen's Haven
Home Ec. | Nile Johnson Design | Pennies for a fortune | Prepford Wife | Rachel Moriarty Interiors
Sachi Lord | Susan Hill Interior Design | This Is Simplicite | Victoria Lee Jones


0 comments