
Genevieve's DIY Velvet Channel Tufted Headboard
8:00 AM
Genevieve's headboard is complete! And we're in love! I'll walk you through how I did it and share what I learned along the way. And bonus: sharing plans for the room at the end!
First, here's what you need:
Supplies
Fabric- I bought 12 yards. Use upholstery weight fabric for a professional look.
Foam- I got mine from the foam factory.*
Staple gun and staples
Wood- I used seven 6"x 1" x 10' pieces and cut it to length with a circular saw.
Metal straps and wood screws (or this one which is more sturdy). I used 4.
Cleat- if you choose to attach to the wall, you'll need a cleat. We used 2 of these.
*My foam length was 7" off and let's just say the customer service was less than stellar. In hindsight, I wish I'd shopped locally. Call your local fabric stores and see if they cut foam- many of them do! If you choose to use foam factory, make sure your order is correct upon receipt. Lastly, you can trim it yourself but I didn't want to risk any mishaps.

Instructions:
First, cut your long wood pieces to match the length of your foam. Ours was 115" long. Use one as a template so they're all the same.
Next lay your items in this order: fabric, batting, foam, then wood. Now you can determine the fabric width. My first piece was 18" but I cut consecutive pieces 16." Cut the batting a little smaller than the fabric. I cut mine to 15". As for length I cut my fabric about 13" longer than the wood + foam to have enough to pull over the ends.

I chose to do one complete bolster before cutting the rest of my fabric and I'm glad I did so I could make adjustments. My finished panels of fabric were 16" x 128" (vs. my foam/wood which was 6" x 115") but it will vary for you based on the size of your foam. Once you're confident, cut the rest of the fabric.
Now comes the easiest part! With your items laid and centered on your fabric, wrap the fabric over the batting/foam/wood, pull taut, and staple. Try to get the staples flush but also you can tap them down with a hammer or mallet later. The piece rolls a bit so I like to start in the middle for stability. A couple of helpful hints make sure your batting is smooth as you go (after a few staples, check the underside or rub your hand over it to make sure it's smooth and not pulling). Also, it helped to shift your foam a bit as you go by just tapping it in toward the wood. It sounds harder than it is. Once you do one, you'll be comfortable and cruising along! For the ends, just fold in, in again, and over as if you're wrapping a gift. Pull taut and staple


Once all your panels are covered, decided the order and direction you want them. One thing to note- my fabric is noticeably darker from one side so I was intentional in choosing direction. Also arrange your bolsters in the order you'd like; i.e. put the prettiest ones on top. ;). Then attach your metal straps. I used a drill but also just a screwdriver in when the drill wasn't cooperating.

Here's where it got tricky for me. My headboard is 7 rows high and the straps weren't strong enough to hold the headboard against the wall - these might have done the trick? This is where the cleat comes in. If you go with a lower headboard, you may not need to attach it- virtual fist bump because you're done!
Attaching to the wall (Optional):
I somehow didn't photograph this, but first decide on placement and mark where the side and top of the headboard hit. Then mark your studs- The goal was to have one screw per cleat go into a stud. We determined height by measuring the first board on the headboard and then going about 1/2 way down (for example if the board is 6", mark the top of the wall cleat 3" below the mark where the top of the headboard will be). For the horizontal placement, we used the studs closest to the ends of the headboard and then attached to the wall using those measurements. Once attached, we placed the headboard against the wall again and marked where the wall cleats hit the headboard. Then attach the cleat to the headboards based on those measurements. Then we mounted the headboard using the cleats. The cleats are designed to slide so if you need to shift it one way or another, that's ok.


Summary
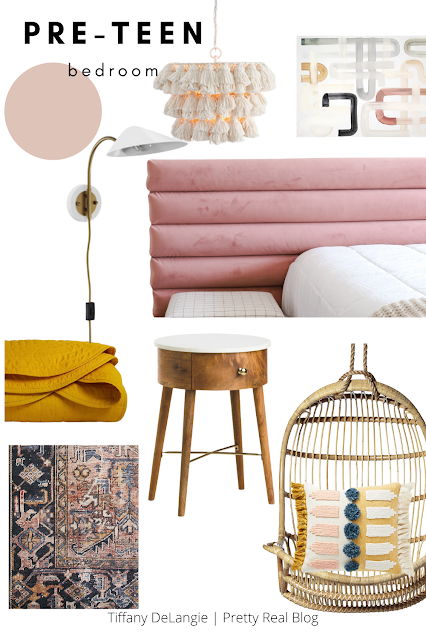
I love it so much and can't wait to continue working on this room! Check out the "DIY bed" highlight to see some of these steps in action. So much fun stuff is coming- styling this beautiful bed, choosing a paint color, installing the cutest light fixture... Keep checking back for more! Here's a glimpse of the loose plan:
If I missed anything, drop your questions below!
Shop the Post:


0 comments