How We Added a Privacy Wall to the Pergola - Pretty Real

How We Added a Privacy Wall to the Pergola

11:25 AM


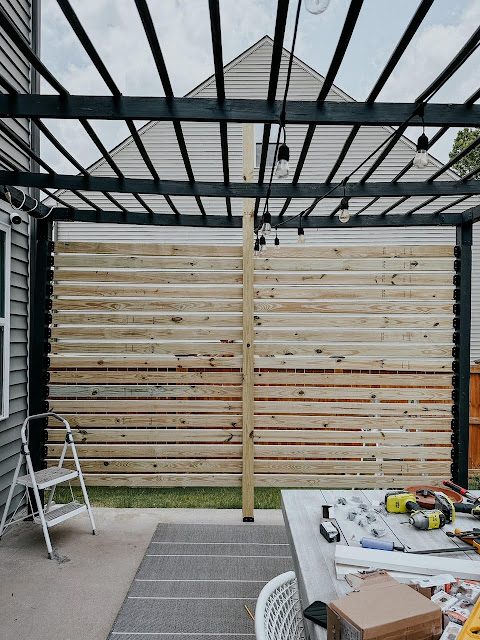
In one of the very first patio posts, I mentioned wanting to close in at least one side of the pergola. 3 years later we finally did it! Here's how:


Supplies:

2x4 pressure treated pine 

joist hangers (or these)

concrete drill bit

concrete screws

Tools:

Drill - side note: using this drill has made me so much more confident with DIY! Highly recommend a powerful, lightweight drill!

level

circular saw

First we decided on size. Initially we were torn between 2x4 and 2x6s, but since nothing else on the Pergola is wider than 4" we went with the 2x4.


Next we decided the spacing by holding up a couple of scrap pieces and ended up with an about an inch between slats. That felt like a good combo of privacy and allowing light through.  


We determined how many 2x4s we needed by taking the total space available (83 inches) and dividing it by 4.5 (a 2x4 is 3.5 inches wide plus the 1in of space between each board). 

We used the same decorative black joist hangers that we used for the 2x4s on top of the pergola during the original build. Each box contains 2 along with screws so we ordered one box per 2x4. You can also order these from toja grid.

One we had the materials, we marked where each joist hanger would go. To make it go faster, Joe cut a 1 inch piece of wood as a template- that way he didn't have to measure each time and knew the spaces would be even.


Avoid This Mistake!


Joe redid this step because he marked them to be completely level but then remembered the patio (and pergola) are slightly angled to allow for water runoff. Luckily he caught this after the first two boards and adjusted so that they were equal on both sides and matched the grade of the pergola and concrete below. 

Starting at the bottom, we screwed in the left and right joist hangers based on the markings (drilling a pilot hole for each screw first to avoid splitting any of the wood), cut a 2x4 based on the width (it varied slightly from the top to the bottom) and then dropped the 2x4 into the hangers- they’re open on top. We didn’t screw each 2x4 into the hangers as we went. We saved that part for last so we could make adjustments for any boards that were slightly bowed. 

Dax was a great helper. ;)


Once all of the horizontal 2x4s were in place, we attached another 2x4 vertically in the middle. We were torn on leaving it without but in the end opted for stability it provided by keeping the boards equally spaced and preventing  sagging over time. We added a joist hanger on top and one on the bottom that was screwed into the concrete by drilling with a drill bit made for concrete and concrete screws. This was probably the most annoying part but once the bottom joist was screwed into the concrete the middle 2x4 slid in and we secured it to the joist hangers with the screws provided (after drilling pilot holes again). We used the original 1 inch spacer block to space the horizontal joist hangers and screwed in each 2x4 to the middle vertical beam from the back. This made sure the spacing was even all the way across. 
outdoor rug (that I LOVE)


The last step was to secure each 2x4 into the side joist hangers. We made sure to use the spacer again here just in case any of the boards had shifted or were a little bowed, drilled more pilot holes and then used the screws provided to finish it up. 

Here's the before:


After:


griddle  |  rug (slightly wet here from rain- it's lighter IRL)  |  table  |  chairs no longer sold


rug  |  table


Now all we have to do is stain it! I love the natural wood in pictures but in real life, it's not nearly as neutral - it's yellow with a greenish hue and has obvious markings.

Any questions? Drop em below!


You Might Also Like

0 comments

Subscribe