No Sew Felt Crown Tutorial- Inspired by Where the Wild Things Are
4:14 PMMaterials:
(Affiliate Links. All of these items can be purchased at your local craft store!).
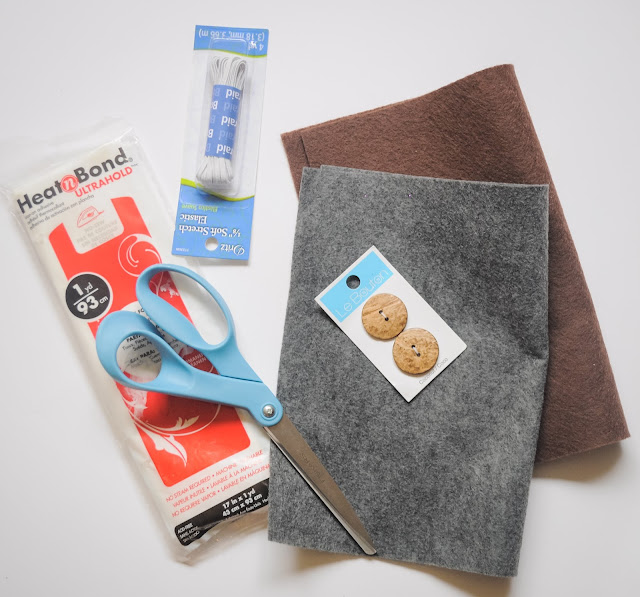
2 sheets of felt in complimenting colors
Heat and Bond (+ Iron)
Elastic
Template - I used this one from HelloBee
Glue gun
Optional:
Embellishments (I used buttons but the sky is the limit- trim, gems, etc).
Pins would be helpful
Step 1. Cut each piece of felt into two 3 1/2 inch strips the length of the felt-- felt is typically about 11 inches long. (you'll have 4 strips)
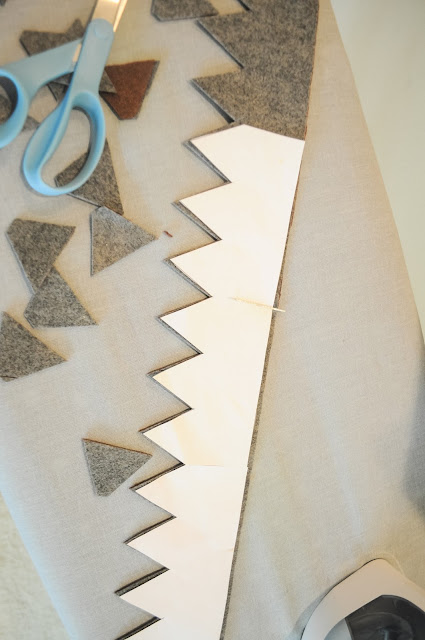
Step 3. Place 2 "like" strips side by side to make one long strip and then place the adhesive over the top (see photo for guidance).
Step 4. Following adhesive packaging instructions, adhere the other felt pieces to the first long strip.
Step 5. Using the template cut your felt into the crown shape. I attached the template with hairpins because I'm resourceful like that. But straight pins would make more sense if you have them. You could probably just hold and cut but I didn't trust myself.
Step 6. Next, I wrapped it around Dax's head to get an idea of the right length, removed it, and trimmed it to just less than necessary (about 1 1/2 inches too short) since I'd be using elastic for a more snug fit.
Step 7. Cut your elastic to the right size and using your glue gun dab and glue elastic to felt crown.
Optional
Step 8. Add embellishment. Since I wanted this to be a no-sew project, I glued my buttons on but kept the thread they come with so that they'd look sewn on. I'm not above faking people out regarding my level of motivation and crafting ability. You could easily attach any embellishments with glue or heat-n-bond.
Note
There are lots of ways to do this project- I often will use a tutorial as a starting point but then make it up as I go along or modify to meet my needs. If you're not opposed to sewing you could do a couple of big stitches instead of elastic- this would especially work for older children who can place it on their heads themselves.
You're done!
Here's a picture of sweet Dax Joey wearing the felt crown. It's not centered because I was using the distract-and-prop method of getting him to keep a hat on. ;)
This sweet DIY felt crown would be perfect for a "Where the Wild Things Are" themed party.
Check out my other felt projects:
$6 Felt Wreath (love this one!)
DIY Sheep Costume- my most visited post on TasteFull.


5 comments
Super cutie Thanks for sharing :)
ReplyDeleteThanks!
DeleteHi. Thank you for sharing this project to us. We included it on our round-up post here, http://sewuber.com/make/diy-costumes-for-children/
ReplyDeletePlease feel free to contact us if you want to add something.
Cheers,
Sandra
Hi! I'd love to make these for my son's birthday but steps 3 and 4 are confusing me :) Am I understanding that I should adhere 2 gray pieces together to make one long 22" piece and do the same with the brown? And then to lay them on top of each other and adhere together? Sorry, DIY novice over here!
ReplyDeleteyes- so unless you buy felt by the yard, it won't be long enough. Therefore you'll have to lay the two pieces down the long way (like in the pic- you can't see the seam but those are two pieces) and then place the adhesive on top of those, then put the two pieces of brown on top- again side by side. Maybe I should have done a video! ha!
Delete