Genevieve's pretty, pink teen room is complete! I'm calling it "done," although there a few things left to do and I know I'll tweak it down the road. I've shared a lot about kid rooms (they're my favorite!)- how to have a room you both like, how this one has been a struggle, and tips on designing kids' spaces in general. And I love that this project pushed me, but I also think Genevieve will see it as a space that was pivotal in determining her own home style. Here are some things to look for:
The last time you heard about Genevieve's room, it was about what was working and what wasn't. Well I'm happy to report that though the scale is still a bit off in her room, we made some adjustments and it's coming along! We had friends over the other night and my girlfriend gave me the best compliment- she said it was such a fun teen room and such a blend of my style with Genevieve's. I almost teared up. ha! It hasn't been easy to balance what I want with what she wants with the actual function and space we have to work with. But we're nearing the end and I have to say, It makes me smile when I catch a glimpse of her room from mine and she seems happy! Ok, so what's left?
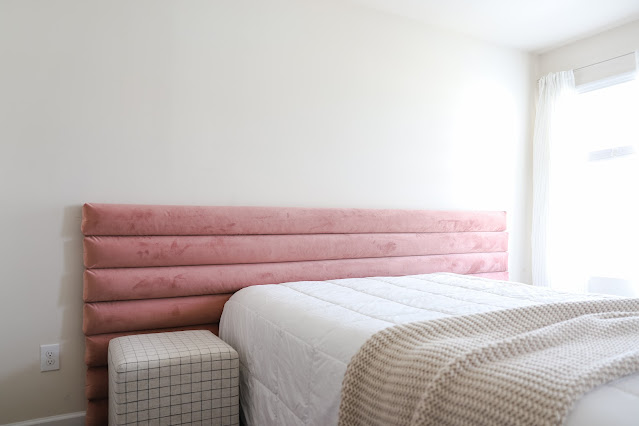
Genevieve's headboard is complete! And we're in love! I'll walk you through how I did it and share what I learned along the way. And bonus: sharing plans for the room at the end!
Thank you Serena & Lily for sponsoring this post. All opinions are mine.
When Genevieve said she wanted her own room, I can't say I was surprised. She and her sister are very close but she's inching (actually more like barreling) toward the teen years and homegirl needs her space. I adore designing kid spaces so we immediately started dreaming about her new room. Her very first request was for a hanging chair and let's just say that was the easiest 'compromise' I'll probably ever make with my almost teenage daughter. While we are in the very beginning stages of the room, the Hanging Rattan Chair from Serena & Lily will absolutely set the tone! It's playful, well made, and cozy- especially when paired with the linen cushion which I have to say is so much prettier and substantial in person than it looks on the site!
My big girl turned 8 in November. Each year I have so much fun choosing her theme. Even on years when she chooses something I wouldn't (Lookin at you Minnie Mouse), it's still fun to get creative while she watches the party come to life. I planned this party in a few days with a trip to Wal-Mart, Hobby Lobby, and an Amazon Purchase. Sources and tips to throw your own simple party are at the end and throughout.
When I pull up to Genevieve's school and watch her playing outside, something happens. I can't explain it but there's something about her being outside of my care for so long (It's still new). And whatever it is, my mind and heart begin racing with both my wishes and my fears for her little life. And sometimes I have to fight back tears. When I watch her play,
I am a novice baker. If you look back at parties I've planned, you'll see simple cakes embellished with store bought items. These are instructions based on my experience,including many helpful resources at the end of the post. Plus if you're a beginner like me, you'll appreciate my helpful hints. These are tips others leave out because they're pros. But first, a little back story...
Since the party would be at jumpin beans, I set up a mock party to grab some photos. I loved using place settings (something I've never done since I typically host at home).
At the venue I used the treats as mini centerpieces.
I loved the favors. I included Olaf and other elements the boys could appreciate. Although Joe kept telling me no one cares as long as there's candy. #truestory
And how about this snow tulle ribbon liner? Only $4.97 at Wal-Mart.
I made a little display board with a picture or two from each month over the past year.
Snow flakes + tissue garland spiced up a plain poster board.
The girls had fun during our little pre-party photo shoot. :)
If the crown fits...
Oh Genevieve.
Can you tell I couldn't choose which photo to share? ♥
Big smiles and a little photo bomber I literally just noticed.
Well melt my heart why don't you?
Love her bright eyes.
Happy Birthday Genevieve!
{More on this Elsa cake later this week. It was a big undertaking. I was quite proud of myself but learned a lot and it would make the time I spent making it much more worth it if someone could learn from my mistakes.}
Sources:
All paper products from Wal-Mart in store (at crazy low prices) but similar products here: teal. purple. blue. paper straws.
Olaf Masks: Here but much cheaper at Wal-Mart.
Olaf cups: Dollar Tree but also here.
Tissue Tassel: DIY using this tutorial. But this one is already assembled and perfect.
Nadia's Elsa Dress: no longer available but this one is cute.
Snow runner or Wal-Mart in store
Plastic Tablecloths: Wal-Mart in store (can't beat .97!) but similar here.
Candy: sour balls. rock candy. Frozen chocolates. Candy canes. I can't find the snowflake suckers but they were from OTC.
affiliate links included.
With fall just around the corner, I thought I'd share Genevieve's Apple themed 4th birthday party. I can't believe she chose "fall," over "Frozen" as a theme. I promise-- it was all her! Well I added the emphasis on apples, but still. It's such a fun theme for a fall birthday. I kept this party somewhat simple since it feels like back to back parties when I host Nadia's party in September and then another in November. Plus I had a 3 month old. Nevertheless I was pleased with how it turned out.
{via}
Or really, in my case, toddler room art. I've been slowly chugging along in re-decorating Genevieve's toddler room. It's been sloooooow going but I feel like I'm FINALLY making some good progress. As for an update:
I posted the tiniest sneak peek known to mankind a few weeks ago. Is it weird that I feel guilty about that? Let's just say I was making up for the 1200 posts I did on Nadia's party. Not that you didn't enjoy every last one of them. ;) So here are a few more details of my baby's 3rd Birthday Party! And this time there will only be two posts--this one featuring the dessert (because let's face it; that's my favorite part!) and one more featuring, well, the rest. So here goes!
the big picture:
The menu consisted of:
.jpg)